After completing online registration, you may notice that the passport photograph on your NYSC dashboard isn’t as good as you expected. It may look blurry, poorly cropped, or simply not professional enough. In some cases, you may even get a notification on your dashboard asking you to upload another NYSC passport photograph because the one you submitted doesn’t meet the required standard.
Since this photograph appears on your green card, call-up letter, and even on the ID card issued in camp, it’s worth making sure it is clear, professional, and acceptable. Whether you’re changing it because NYSC asked you to or because you have a better photograph, it’s important to get it right.
The good news is that changing it is easier than many PCMs think. Unfortunately, most don’t know the process, so they end up paying someone else for something they can do themselves in just a few minutes.
In this guide, I’ll show you everything you need to know about preparing the right photograph for NYSC and uploading it successfully on your dashboard.
Can You Change Your Passport Photograph on NYSC Dashboard?
Under normal circumstances, you cannot do that. Once you’ve completed NYSC registration, you can’t simply log in to your dashboard and replace your passport photograph.
The only opportunity some PCMs get is when NYSC sends them a notification on their dashboard asking them to upload another passport photograph. This usually happens only to few whose photographs don’t meet the required standard.
But what if you weren’t asked to upload another photograph and you still want to replace the one on your dashboard? Maybe you’ve taken a better picture, or you simply don’t like the one that was captured during your online registration.

Thankfully, there’s a way around this. In the sections below, I’ll show you how to prepare a new photograph that meets NYSC’s standard and use it to replace the existing one on your dashboard, whether or not you’ve received the notification to do so.
Why You May Need to Change Your NYSC Passport Photograph
There are several reasons why you may want to change your NYSC passport photograph. For some PCMs, it’s because NYSC has asked them to upload another photograph after reviewing the one captured during online registration.
For many others however, the reason is much simpler. The photograph captured at the cyber café may not have come out well. It could be blurry, poorly positioned, taken under poor lighting, or have a distracting background. Since this photograph will remain part of your NYSC records throughout the service year, many PCMs prefer to replace it with one that looks clearer and more professional.
📌 Bonus: Message on Whatsapp to process your medical fitness certificate. It is a compulsory requirement for camp registration.
Another reason is to avoid issues at the orientation camp. Over the years, some PCMs have been sent home because the dressing in their passport photographs was considered indecent by NYSC. Others simply want to replace the photograph because they now have a better one than the one captured during online registration. Whatever your reason, if you have the opportunity to change it, it’s worth doing it properly.
NYSC Passport Photograph Requirements
Before you upload another NYSC passport photograph, you need to make sure the new one meets the specifications required by NYSC. Otherwise, the photograph may not be accepted when you try to upload it.
This table summarizes the basic requirements:
| Requirement | Specification |
|---|---|
| Image dimensions | 200 × 200 pixels |
| File size | Between 7KB and 15KB |
| Background colour | Preferably white. Off-white can also work. |
| Image quality | Clear and neatly cropped with the subject centered properly. |
| Dressing Style | Any dressing decent enough for official settings. |
| Face position | Clearly visible and facing the camera |
For the best result, use a clear photograph taken from around your upper stomach or chest upward. This gives you enough room to crop the image into the required 200 × 200 pixels without cutting off part of your head or shoulders. If the background isn’t white, don’t worry. I’ll show you how to change it before uploading the photograph.
How to Change Your NYSC Passport Photograph
Follow the steps below to properly resize your passport photograph and upload it to your NYSC dashboard. As long as you read the instructions carefully and follow each step, you’ll be able to do it on your own. Even dummies can get it right on their first attempt.
📌 Advise: Join this NYSC Whatsapp Channel for the latest NYSC news today. The platform provides the latest information on 2026 Batch C Stream 2 and valuable tips for online registration.
If you prefer a video tutorial, I made one for you. Kindly ensure to like and subscribe to the YouTube channel.
Step 1: Take or Choose a Suitable Photograph
Start with a clear photograph of yourself. You can use a passport photograph taken at a studio or simply take one with your phone’s camera. Make sure it captures you from around your upper stomach or chest upward. This gives you enough room to crop the image later without affecting the final result.
While taking the photograph, face the camera directly with your eyes fully open. Avoid wearing sunglasses or anything that covers your eyes. Also, ensure that both ears are visible, as this gives the photograph a proper passport-style appearance.
Step 2: Change the Background to White
For the best result, it is advisable to use a photograph with a white background. If your photograph doesn’t have a white background, visit remove.bg and upload it. The website will automatically remove the existing background colour.
Once that is done, click on “background”, then select the “color” tab to choose White from the list of available colours. This will automatically replace the removed background with white.
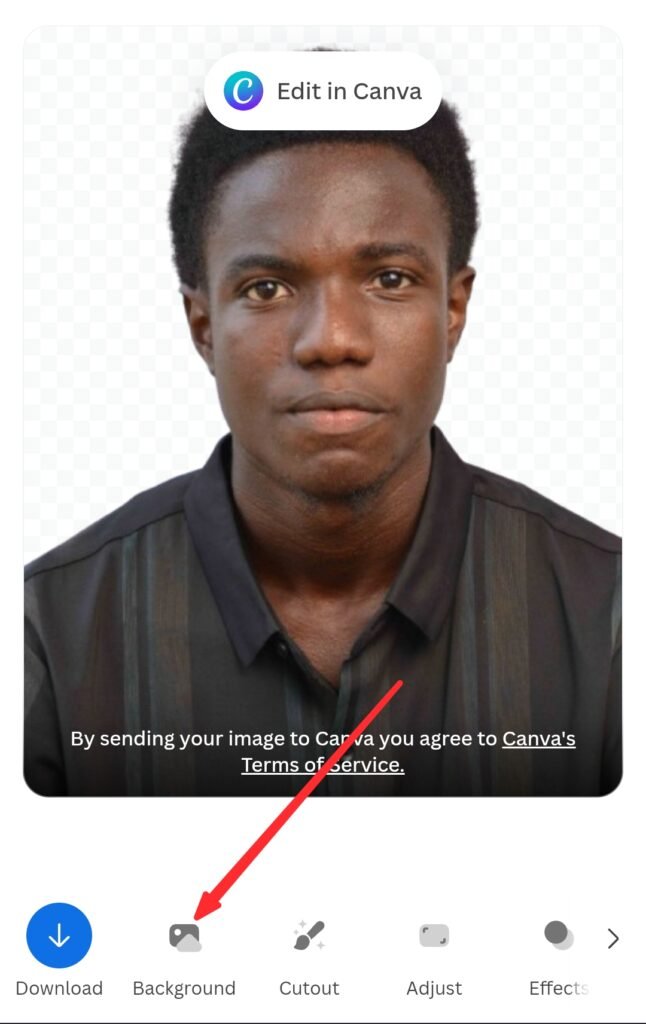
Once that is done, tap the download button and click on “preview” to download the edited photograph to your device.
Step 3: Crop the Photograph to 200 × 200 Pixels
Next, visit imresizer.com to resize your image. I’ve already configured the link to use the needed 200 × 200 pixel dimensions, so you don’t need to adjust the settings anymore.
Upload the photograph you downloaded from Remove.bg. When the editing options appear, select “Crop.” If necessary, drag the edges of the cropping box until you get your desired image. Remember that only the inside of the box will appear in the final passport photograph.
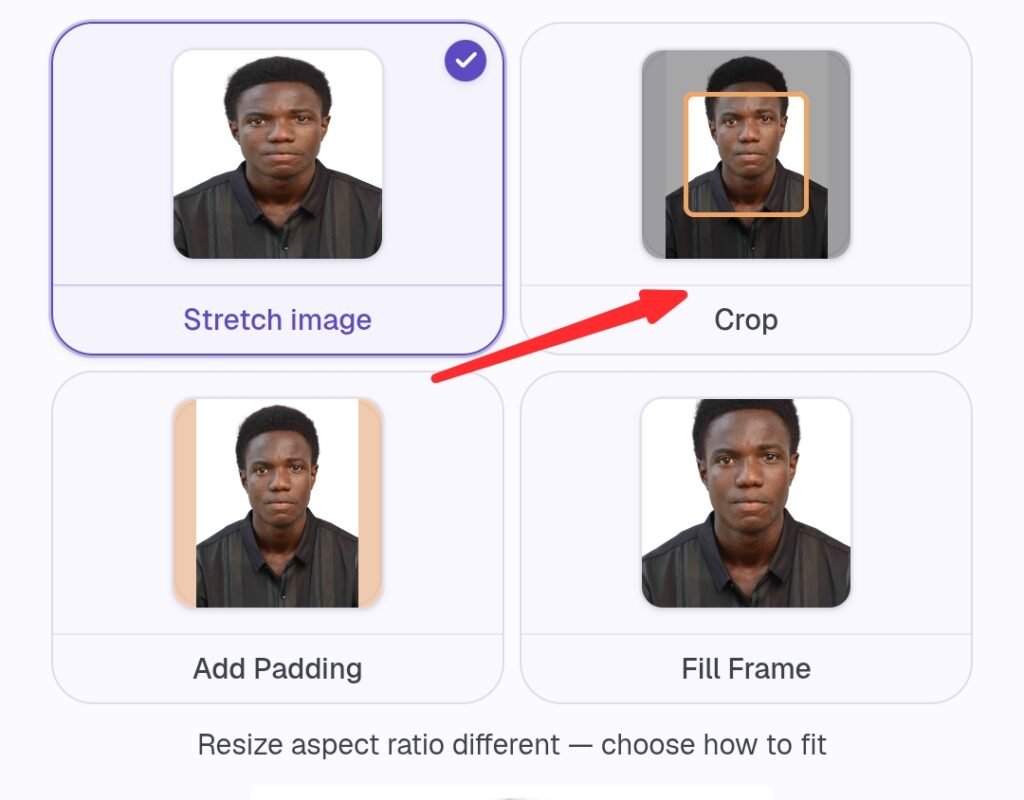
Avoid using stretch, padding, or fill as these options will distort the image. Once you’re satisfied with the crop, tap on “Apply” and this will open the export page.
Step 4: Save the Resized Photograph
Click on Export Settings. Inside the “max file size” box, enter 14 as your preferred output size, then click on continue to download.
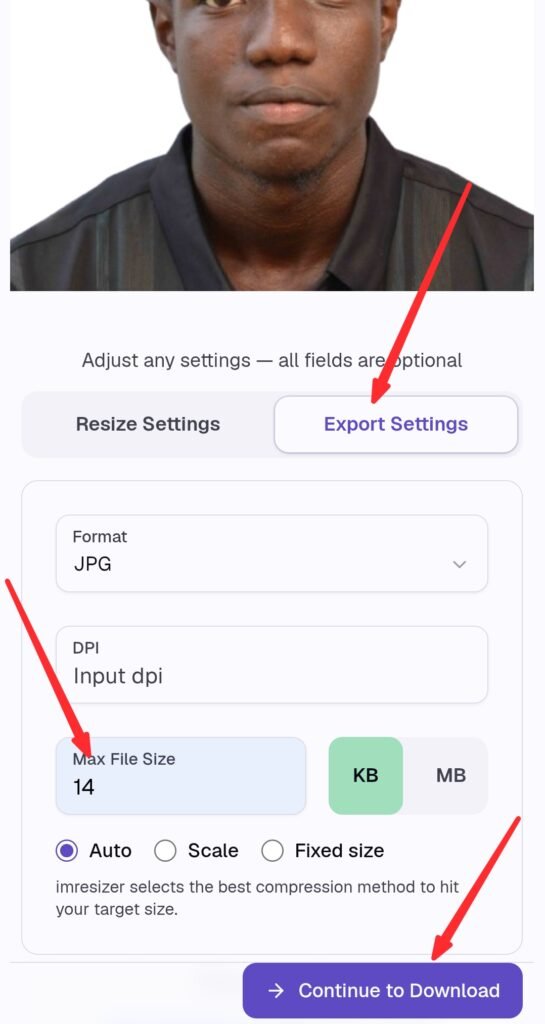
Entering 14kb gives the image enough room to stay within the required file size. That way, the downloaded photograph won’t exceed the maximum size allowed on NYSC portal. Once the image has been processed, download it to your device.
Step 5: Upload the Photograph to Your NYSC Dashboard
Now is the time to upload the image we’ve worked on. To do that, you need to login to your NYSC dashboard first. Once you’re logged in, return here and click the link below.
Here 👇🏾 https://portal.nysc.org.ng/nysc/UpdatePassportPhotograph.aspx
Since you’re logged in already, this link will take you to the passport photograph upload page. Select the photograph you prepared and upload it.
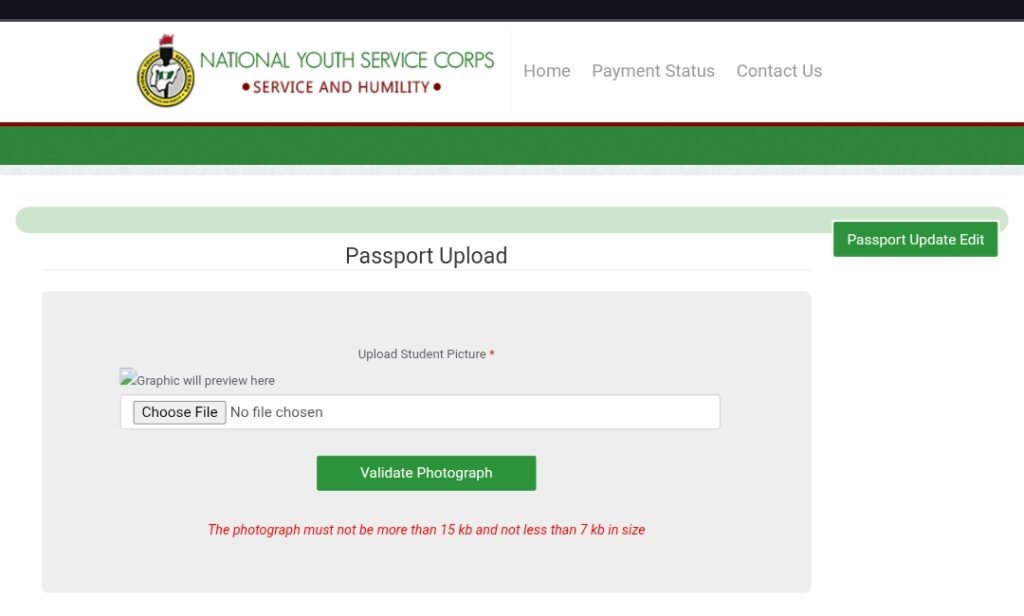
Note: You must log in to your NYSC dashboard first before clicking the link provided above. If you open the link without logging in first, it won’t take you to the upload page.
If you follow the steps in this guide, your new passport photograph should upload successfully without any issue.
👉 Exclusive: Want to look dope for 2026 Batch C Stream 2? Message Fola NYSC Camp Kit now for a quality and affordable purchase.
Final Tips on NYSC Passport Upload
Now, that’s how you can change the NYSC passport photograph on your dashboard. As you’ve seen, the process isn’t difficult at all. As long as you follow each step carefully, you should be able to do it yourself.
That said, I only recommend changing your passport photograph if you haven’t registered in camp yet. The photograph is mainly used for verification during camp registration. Once you’ve passed that stage and you’re already serving, changing it doesn’t really make any difference.

If you encountered any error, try reaching out to these NYSC support numbers for help.
👉🏽 09151079228
👉🏽 08092142614
👉🏽 08102790538
👉🏽 08092142661
👉🏽 09038034460
👉🏽 08092142616
👉🏽 07018836388
If this guide worked for you, I’d love to hear from you. Leave a comment below and let me know how it went.
People are also reading:
NYSC Camp Registration Errors Every PCM Must Avoid
Join Now: Active NYSC Whatsapp Group for Batch ‘C’ 2026